The difference between mediocre AI images and jaw-dropping creations isn't about luck or expensive tools — it's about understanding how Nano Banana Pro thinks and learning to speak its visual language.
I still remember the exact moment everything changed. It was 3 AM when my phone started buzzing non-stop. My creative communities were on fire. "Have you seen it?" "Google just dropped something insane." "Forget everything you knew about AI images." I rubbed my eyes, opened my laptop, and what I saw changed everything I thought I knew about AI image generation.
Nano Banana Pro had arrived. Not as a minor update, not as an incremental improvement, but as a complete paradigm shift. Within minutes of testing it, I was generating text that was actually readable in multiple languages, colorizing manga with a single prompt, creating movie posters that looked like they came from a Hollywood studio. The groups I was in exploded with examples — each more stunning than the last.
That night, I didn't sleep. I generated hundreds of images, testing every technique I could think of, pushing boundaries I didn't know existed. By the time the sun came up, I had documented eight completely new creative workflows that weren't possible just 24 hours earlier. And over the following weeks, I discovered seven more. This is everything I learned — the complete guide to mastering Nano Banana Pro that I wish had existed when I started my all-night journey into the future of AI image generation.
The Night Everything Changed
Let me take you back to that moment. I had been using AI image generators for over a year — DALL-E, Midjourney, Stable Diffusion, the original Gemini image models. They were impressive, sure, but they all shared the same frustrating limitations. Text rendering was a disaster. Non-Latin scripts came out looking like alien hieroglyphics. Maintaining character consistency across multiple images? Forget about it.
I had settled into a workflow of using AI for initial concepts, then spending hours in Photoshop fixing the inevitable issues. Text had to be added manually. Faces needed touching up. It was useful, but it felt like the technology was perpetually 80% of the way there.
Then Nano Banana Pro dropped.
The first thing I tried was a movie poster with complex typography — something that had always been impossible. I typed a prompt asking for flowing artistic calligraphy, stylized title text, and elegant subtitle placement. What appeared on my screen made me audibly gasp. The characters were perfect. The typography was beautiful. The composition was professional. I sat there staring at it for a full minute.
The moment I realized Nano Banana Pro was different: I asked it to generate stylized calligraphy, expecting the usual garbled mess, and instead got typography that looked like it came from a professional design studio. That's when I knew the rules had changed.
Over the next several hours, I discovered capability after capability that I didn't know was possible. I colorized a black-and-white manga page while simultaneously translating the text. I created architectural blueprints from a single photograph. I generated game interfaces so realistic that friends asked me which game they were from. Each discovery led to another, and another, until the sun came up and I realized I hadn't moved from my desk in eight hours.
What follows is everything I learned during that night and the weeks of intensive experimentation that followed. This isn't a surface-level overview — it's the deep knowledge that comes from pushing these tools to their absolute limits and documenting what works, what doesn't, and why.
What Makes Nano Banana Pro Different
Before we dive into techniques, let me explain exactly what Nano Banana Pro is and why it represents such a significant leap forward. Nano Banana Pro — officially called Gemini 2.0 Flash Image — is Google's most advanced image generation model, built on the foundation of Gemini 2.0's powerful reasoning capabilities.
This isn't just marketing speak. The integration with Gemini 2.0 means that Nano Banana Pro doesn't just generate images based on pattern matching — it actually understands what you're asking for. It has world knowledge. It can reason about spatial relationships, cultural contexts, and technical specifications. Ask it about a famous landmark, and it knows the architectural style, the historical context, and how to represent it accurately.
Revolutionary Text Rendering
State-of-the-art text rendering in multiple languages with dramatically improved spelling accuracy. Typography that actually looks professional across Latin, CJK, and other scripts. This alone changes what's possible with AI image generation.
Deep World Knowledge
Built on Gemini 2.0 Flash's reasoning capabilities, it understands context, culture, and complexity. It knows historical references, architectural styles, scientific concepts, and cultural nuances — and can represent them visually.
Precision Control
Studio-grade control over lighting, camera angles, depth of field, and composition. Professional photographers and designers can finally get results that match their vision without endless regeneration.
Multi-Image Composition
Combine up to 14 reference images into a single composition. Maintain character consistency, blend styles, transfer elements between images — all while preserving the qualities you want to keep.
Flexible Output
Native 2K resolution with optional 4K output. Multiple aspect ratios supported. Generate everything from vertical phone wallpapers to cinematic 21:9 widescreen compositions.
Intelligent Editing
Modify existing images with text commands while preserving elements you want to keep. Change seasons, swap objects, adjust lighting — all without the drift problems that plagued earlier models.
Where to Access Nano Banana Pro
Currently, Nano Banana Pro is available through several channels, each with different capabilities:
- Gemini App: The most accessible option. In Gemini, enable "Thinking" mode and request image generation to activate Nano Banana Pro. This gives you the full model capabilities with a conversation-based interface.
- Google AI Studio: For developers and power users who want more control. Access advanced parameters and integrate with custom workflows.
- Vertex AI: Enterprise-grade access with full API capabilities for production applications.
- Third-Party Platforms: Services like Lovart.ai often offer early access to new models with free trial periods.
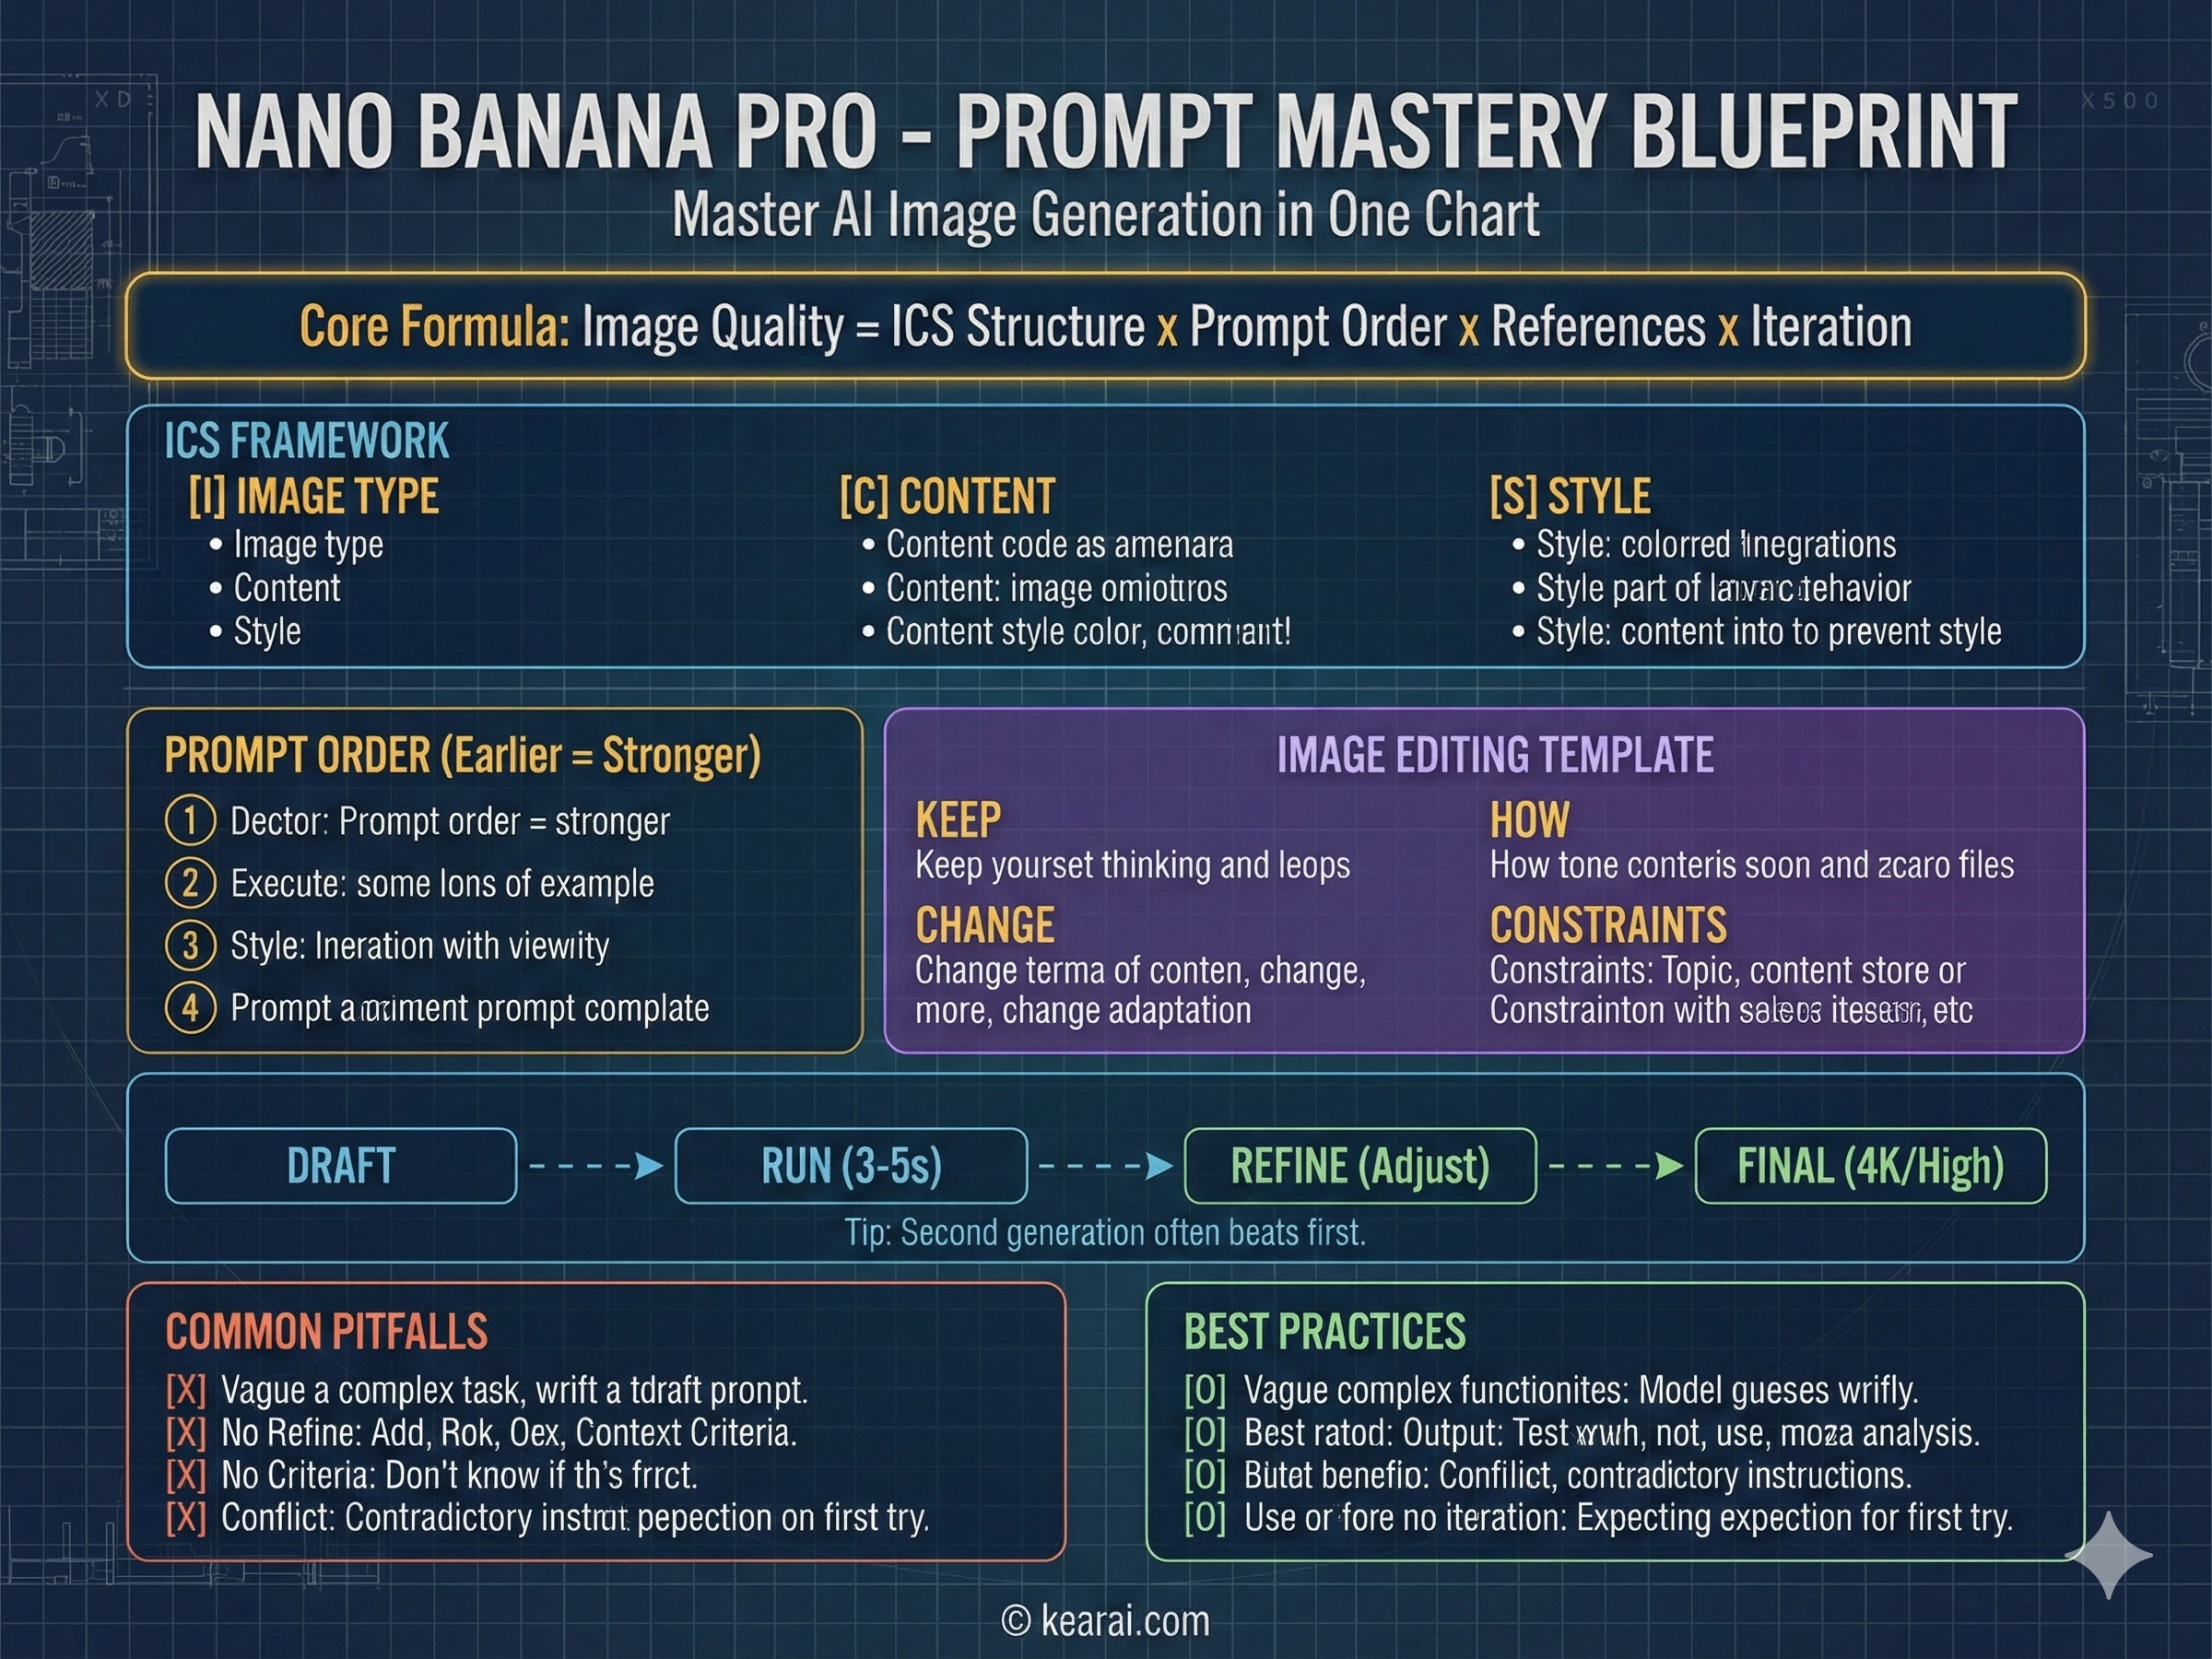
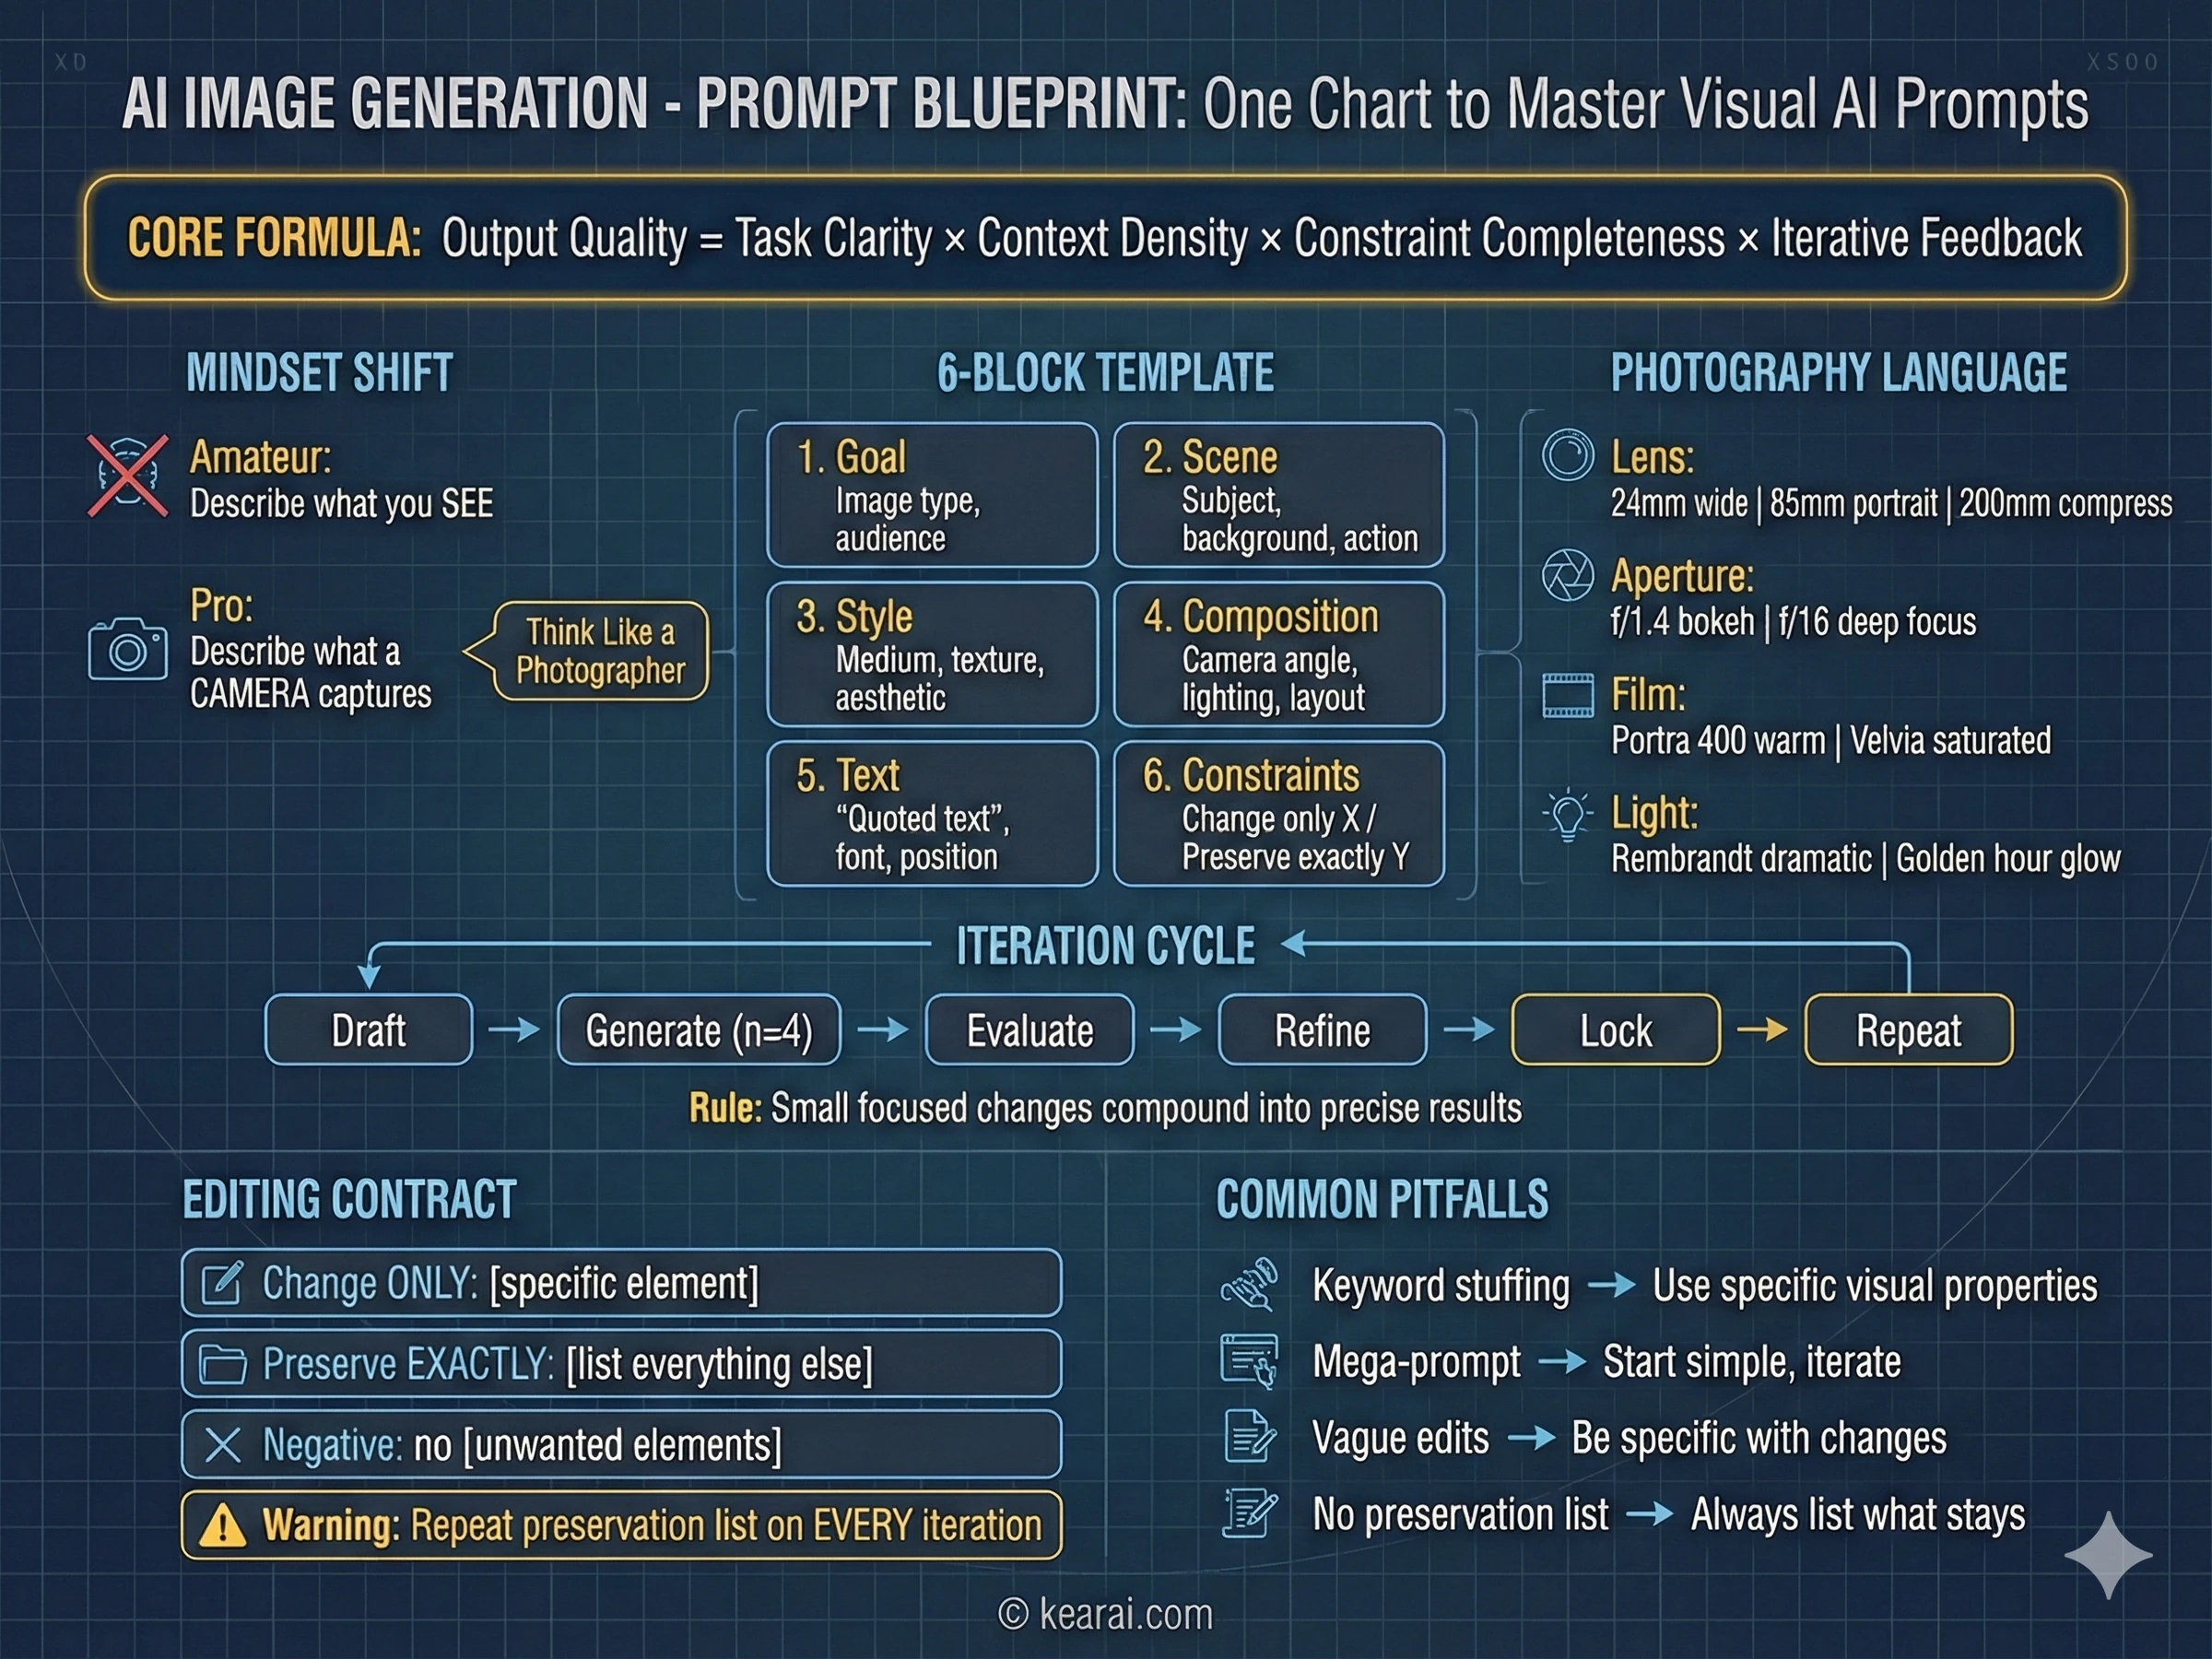
Pro tip: In the Gemini app, generating a second image with the same prompt often produces better results than the first attempt. The model seems to use the first generation as implicit context for refinement. I've made this part of my standard workflow.
The Three Breakthroughs That Matter
While Nano Banana Pro includes dozens of improvements, three specific breakthroughs fundamentally change what's possible with AI image generation. Understanding these will help you leverage the model's true power.
Previous models either couldn't generate high-resolution images or required upscaling that often introduced artifacts. Nano Banana Pro generates native 4K images directly, with the detail and clarity built in from the start. This isn't just about pixel count — it's about genuine detail at the level of individual eyelashes, fabric weave patterns, and subtle texture variations. For product photography and commercial work, this changes everything.
Need a 9:16 vertical poster? A 21:9 cinematic frame? A perfect square for Instagram? Nano Banana Pro handles any aspect ratio without the composition issues that plagued earlier models. The AI understands how to compose images correctly regardless of format — subjects don't get awkwardly cropped, text doesn't overflow, and the visual balance remains professional.
This is the big one. Because Nano Banana Pro is built on Gemini 2.0's reasoning engine, it doesn't just match patterns — it thinks about what you're asking for. Ask for an architectural diagram of a building, and it reasons about structural engineering. Ask for a scientific illustration, and it draws on actual scientific knowledge. Ask for a cultural reference, and it understands the context. This reasoning capability is what enables most of the advanced techniques in this guide.
The Text Rendering Revolution
I need to spend a moment on text rendering because this was the capability that most shocked me. For years, AI image generators have been essentially useless for any serious work involving text beyond simple English words. Complex typography, stylized fonts, and non-Latin scripts would come out garbled, repeated, missing elements, or simply wrong. You could generate a beautiful image and then have to completely redo any text elements in Photoshop.
Nano Banana Pro changes this completely. I've generated movie posters with complex calligraphy, product packaging with detailed specifications, infographics with dense paragraph text — all rendered correctly. The typography isn't just legible; it's actually beautiful. Font styles are respected. Character spacing is natural. This single capability opens up entire categories of work that were previously impossible.
And it's not just stylized text. Standard English text rendering has also improved dramatically. Small text stays legible. Spelling accuracy is remarkable. You can include paragraphs of text in an image and actually use the result professionally.
The Prompt Framework That Changes Everything
After generating thousands of images with Nano Banana Pro, I've developed a structured approach to prompts that consistently produces exceptional results. Forget the old keyword-stuffing techniques from earlier AI models — "masterpiece, ultra-detailed, trending on ArtStation" doesn't help here. Nano Banana Pro responds to clarity, structure, and specificity.
I call it the ICS Framework: Image type, Content, and Style. Every effective prompt I write now follows this structure.
IMAGE TYPE:
- [What kind of image: photograph, illustration, diagram, poster, UI mockup, etc.]
- [Intended use and audience context]

CONTENT:
- [Main subject with specific details]
- [Background/environment description]
- [Action or relationship between elements]
- [Any text that should appear, in quotes]

STYLE:
- [Medium: photography, watercolor, 3D render, vector, etc.]
- [Reference: "Apple product photography", "vintage travel poster", etc.]
- [Technical details: camera lens, lighting, color palette]
- [Quality and resolution requirements]
This framework gives the model clear context for every visual decision it needs to make.
The Hierarchy Principle
Here's something most guides won't tell you: the order of information in your prompt matters. Elements mentioned earlier have more influence on the final result. I structure my prompts with the most important elements first:
What is the main focus of the image? Define this clearly and early. "A ceramic coffee mug" is better than "an image showing a mug."
What is happening? How do elements relate to each other? "The mug sits on a weathered wooden table, steam rising from hot coffee inside."
Where is this taking place? What surrounds the subject? "Morning light streams through a café window, creating soft shadows."
How should it be rendered? What camera, lighting, or artistic style? "Shot on Canon 5D Mark IV, 85mm lens, f/2.8, natural color grading."
The Seven Principles of Effective Prompting
Beyond structure, these principles govern how I write every prompt. They're the difference between images that almost work and images that nail your vision.
Structure Over Keywords
Use a consistent order: background → subject → details → constraints. For complex requests, use labeled sections or line breaks. Long paragraphs confuse the model; organized structure guides it toward your intention.
Specificity Over Superlatives
Instead of "high quality" or "ultra-detailed," describe actual visual properties. Materials, textures, shapes, mediums. "Visible skin pores and subtle freckles" beats "highly detailed face" every time.
Explicit Composition Control
Name your framing (close-up, wide shot, bird's eye), perspective (eye-level, low-angle, Dutch angle), and lighting mood (soft diffuse, golden hour, high-contrast rim light). Don't leave these to chance.
The Change vs. Preserve Contract
For editing, explicitly state what should change AND what should remain untouched. Use "change only X" and "preserve exactly Y." Repeat this preservation list on every iteration to prevent drift.
Text Demands Precision
Put required text in "quotes" or ALL CAPS. Specify font style, size, color, and position. For difficult words or brand names, spell them out letter-by-letter. Always add "render exactly once, no duplicates."
Multi-Image Reference Clarity
When working with multiple input images, reference each by index and description: "Image 1: the product shot, Image 2: the style reference." Explicitly state how they should interact.
Iterate Rather Than Overload
Start with a clean base prompt, then refine with small, single-change follow-ups. "Make the lighting warmer." "Remove the background tree." Small steps compound into precise results.
Practical Prompt Examples
Let me show you how this framework translates to real prompts across different use cases:
A photorealistic close-up portrait of an elderly Japanese ceramicist
inspecting a tea bowl. Golden hour light streams through a window,
creating warm highlights on weathered hands. Shot on Canon 5D Mark IV
with 85mm lens at f/2.8. Shallow depth of field with bokeh background.
Natural color grading, visible skin texture and pores. 16:9 format.A kawaii-style sticker of a red panda wearing a bamboo hat.
Bold black outlines, cel-shading style, pastel color palette
with soft pinks and greens. Cute expression with sparkly eyes.
White background for easy cutout. Simple, clean design suitable
for merchandise printing.Art poster for a film noir mystery. Central imagery shows
a detective silhouette against rain-streaked windows.
Main title in bold Art Deco typography "SHADOWS OF DOUBT",
with elegant thin serif subtitle "Some secrets should stay buried" below.
Small production credits text at bottom for authenticity.
All text must be clear and legible. Cinematic quality, moody atmosphere.
High contrast lighting with deep shadows and dramatic highlights.The key difference with Nano Banana Pro prompting: describe what you want to see, not how you want to feel. "A stunning beautiful amazing image" tells the AI nothing. "Golden hour backlighting creating long shadows on cobblestone streets" tells it exactly what to render.
Manga Colorization and Translation Magic
This technique was my first jaw-dropping discovery with Nano Banana Pro, and it remains one of the most impressive capabilities I've seen. The ability to take a black-and-white manga page, colorize it, and translate the text — all in a single prompt — fundamentally changes workflows for manga fans, publishers, and content creators.
Here's how I discovered it. I've always struggled with reading black-and-white manga. There's something about the dense visual information without color cues that makes it hard for me to follow the action. I had tried various colorization tools, but they all required significant manual work and couldn't handle the text.
On that first night with Nano Banana Pro, I uploaded a page from Demon Slayer and typed a simple prompt: "Turn this image into color, translate to English and place the text in the corresponding speech bubbles, keep everything else the same, then give me the image."
What came back was stunning. The colors were vibrant and appropriate to the characters — Tanjiro's green-checkered pattern rendered perfectly. The Japanese text in the speech bubbles had been replaced with accurate English translations. The line art was preserved. It looked like an official colored release.
Transform this black-and-white manga panel:
1. Colorize with vibrant, anime-appropriate colors
2. Translate all Japanese text to English
3. Place translated text in the appropriate speech bubbles
4. Preserve all original character expressions and composition
5. Return as a complete, print-ready image
Advanced Manga Techniques
But the real magic is that you can go further. Much further. You can transform the same manga page into completely different styles:
// 3D Plush Style
Transform this manga into 3D plush/fuzzy texture style.
Keep the characters recognizable but render them as if they
were soft plush toys. Maintain speech bubbles and text.

// Medieval Mosaic Style
Transform this manga into medieval stone mosaic style,
like religious artwork from ancient churches. Give it a
sacred, reverent feeling while preserving the story panels.

// Bronze Relief Style
Convert this manga page into bronze relief sculpture style.
Render characters and scenes as if they were embossed in
aged bronze metal, with appropriate patina and lighting.
I spent hours that first night creating the same manga scene in dozens of styles — copper engravings, watercolor paintings, pixel art, claymation. Each transformation preserved the story structure while completely reimagining the visual approach. This opens up possibilities for fan art, educational materials, and creative projects that simply weren't feasible before.
Pro tip for manga colorization: Nano Banana Pro understands anime character conventions. You don't need to specify hair colors for well-known characters — it knows that Tanjiro has burgundy-tipped black hair and green-checkered haori. This built-in knowledge makes colorization faster and more accurate.
Professional Poster and Visual Design
Poster design was where I really started to understand the power of Nano Banana Pro's text rendering. Previous AI models could generate beautiful imagery, but the moment you needed text — titles, credits, taglines — you were back to manual work in Photoshop. Nano Banana Pro changes this equation completely.
Let me walk you through some specific examples that demonstrate what's now possible:
Cinematic Movie Posters
Create a movie poster for 'Robot Dreams' in retro mid-century animation style.

Scene: Anthropomorphic dog and boxy blue-grey robot walking hand-in-hand on a
sandy beach at sunset, facing a dilapidated amusement park pier with a large
ferris wheel and roller coaster. Deep orange sky.

Style: Flat illustration, bold outlines, warm retro color palette.

Typography: Title "ROBOT DREAMS" in huge bold letters at top center, deep orange
color. Small festival logos at top edge. White review quotes scattered around
characters.

Mood: Nostalgic, melancholic, heartwarming.
The result looks indistinguishable from actual vintage movie posters. The text is crisp and properly kerned. The illustration style is consistent throughout. Even the subtle details like festival laurels and review blurbs render correctly.
Typography-Heavy Posters
This is where things get really impressive. Complex typography with multiple fonts, sizes, and styles that previous AI models simply couldn't grasp:
Art poster for the film "Dead Poets Society".
Classic artistic style with a scene depicting the iconic
standing-on-desks moment. Main title in flowing artistic
hand-brushed calligraphy style with elegant, thin brushstrokes.
English subtitle "Carpe Diem" below in refined sans-serif.
Tagline "Seize the day" as small text element.
Additional small production credits text for authenticity.
All text must be clear and legible. Premium quality, cinematic
atmosphere conveying wonder and inspiration.
The poster that generates from this prompt could easily pass for professional studio work. The calligraphy has proper stroke weight variation. The composition follows classic design principles. Viewers would never guess it was AI-generated.
Cyberpunk Visual Design
For complex designs with lots of text, Nano Banana Pro handles the challenge remarkably well:
Cyberpunk key visual poster with dense text elements.
Neon-lit urban environment with holographic displays showing
various text and data readouts. Main subject: a cybernetic character
with glowing implants. Multiple floating text panels with technical
specifications and warning labels.

Style: high contrast, neon colors against dark backgrounds.
Include both large display text and small detail text.
All characters must be properly formed and legible.
16:9 cinematic format.Design tip: When working with text-heavy posters, always specify "all text must be clear and legible" somewhere in your prompt. This seems to activate additional quality checks in the model that improve text rendering accuracy.
Knowledge Visualization and Diagrams
Because Nano Banana Pro is built on Gemini 2.0's reasoning capabilities, it can generate educational diagrams and knowledge visualizations that actually make sense. This isn't just about rendering pretty pictures — it's about accurately representing complex information.
I tested this by asking it to create a structural diagram of famous historical structures. Without providing any reference images, I simply asked:
Generate a detailed structural diagram of a Gothic cathedral
with comprehensive explanatory text. Show the flying buttress system,
the nave and transept layout, and the multi-story elevation.
Include detailed annotations explaining the construction techniques
that have allowed these medieval structures to survive for centuries.
All text must be clear and legible.
The result was stunning. The diagram accurately showed the structural engineering marvels of Gothic architecture. The proportions matched actual buildings. And the annotations provided accurate historical and engineering information. This is the reasoning capability in action — the model actually knows about architectural history and can represent that knowledge visually.
Traditional Craft Documentation
Another powerful application is documenting traditional crafts and techniques:
Create a detailed visual guide to traditional Japanese sashiko
embroidery techniques. Show the different stitch patterns with
close-up examples. Include the traditional indigo and white color palette.
Demonstrate needle angles and thread tensions for achieving different
effects. Add comprehensive explanatory text covering the history and
regional variations of this craft. Educational infographic style
with clear layout.
Technical Concept Diagrams
For science fiction and concept work, Nano Banana Pro can create impressive technical documentation:
Detailed technical exploded view diagram of a cyberpunk prosthetic eye.
Show all internal components: optical sensors, neural interface
connections, power supply, processing unit, adjustment mechanisms.
Label each component with technical specifications. Include cross-section
view showing how it interfaces with the optic nerve. Photorealistic
rendering with technical drawing annotations. Futuristic but
scientifically plausible design.
The level of detail in these technical diagrams rivals what a professional concept artist would produce, but generates in seconds. For game designers, science fiction writers, and concept artists, this is an incredible rapid prototyping tool.
The Mind-Blowing Math Solving Capability
This one genuinely shocked me. Nano Banana Pro doesn't just generate images — it can solve math problems and render the solution process as a handwritten work page. The reasoning engine behind the image generation actually works through the mathematical logic.
I tested this with a geometry problem involving triangles and angle calculations. I uploaded a screenshot of the problem and prompted:
Draw a sheet of scratch paper showing the complete solution
to this math problem. Show all work including diagrams,
equations, and step-by-step calculations. Make it look like
authentic student handwriting with natural variations.
Include geometric sketches where relevant.
What came back was a realistic-looking page of handwritten mathematics, complete with:
- Geometric diagrams with labeled angles and sides
- Step-by-step algebraic manipulation
- Correctly applied theorems and formulas
- A circled final answer
- Natural handwriting imperfections that made it look genuine
And here's the thing — the math was actually correct. The model didn't just create something that looked like a solution; it worked through the actual mathematical reasoning and arrived at the right answer. For educational content creators, tutoring services, or anyone who needs to show mathematical work, this is remarkable.
Important Caveat
While Nano Banana Pro gets math right most of the time, you should always verify solutions for anything important. The reasoning is impressive but not infallible. I've seen occasional errors on complex multi-step problems.
Paper to Whiteboard Transformations
One of the most practical applications I've found is transforming long-form content — research papers, articles, technical documentation — into visual whiteboard summaries. This technique was highlighted by researchers on X (formerly Twitter) and has become one of my go-to workflows.
The basic approach is simple: provide a text document (either as uploaded PDF, pasted text, or via screenshot) and ask for a whiteboard-style visual summary:
Transform this research paper/article into a detailed whiteboard
photo showing the key concepts, relationships, and findings.
Use a natural handwritten style with:
- Boxes and containers for main concepts
- Arrows showing relationships and flow
- Bullet points for key details
- Simple diagrams where helpful
- Color coding for different themes

Make it look like an actual photographed whiteboard with
realistic lighting and perspective. Include all important
information in a scannable, hierarchical layout.
I tested this with a lengthy technical paper about LLaMA 3 architecture. Nano Banana Pro generated a whiteboard summary that captured the key innovations, architectural decisions, training approach, and benchmark results — all in a format that could be understood at a glance.
The applications are enormous:
- Students: Transform lecture notes or textbook chapters into visual study aids
- Researchers: Create quick visual summaries of papers for presentations
- Teachers: Generate board-style explanations without actually writing on a board
- Content creators: Transform written content into engaging visual formats
As one researcher noted, this capability could essentially replace the need for teachers to manually write out explanations on whiteboards — though I'd argue it's better used as a supplement rather than a replacement.
Game Interface Generation
Nano Banana Pro has clearly been trained on an enormous corpus of game footage and screenshots, because its ability to generate convincing game interfaces is remarkable. This goes beyond simple mockups — it understands game UI conventions, genre-specific elements, and even regional variations in game design.
Deep Sea Exploration Game
Generate a screenshot from a deep-sea exploration game similar to Dave the Diver.

Scene: Diver encountering a massive unknown creature in the abyss.

UI elements:
- Depth indicator showing 850m
- Oxygen gauge at 40%
- Inventory slots in bottom left
- Mini-map in top right corner
- "WARNING: Unknown lifeform detected" alert

Style: Pixel art with modern lighting effects, atmospheric fog, bioluminescent creatures.
FPS Game Screenshot
Generate a screenshot from a Call of Duty style first-person shooter,
but the enemy is a Shiba Inu dog (Cheems meme). Full FPS interface
with crosshairs, ammo counter, minimap, health bar, and killstreak
indicators. The Cheems should be in tactical gear. Photorealistic
graphics style with cinematic lighting. Include hit markers and
slight motion blur for action feel.
This combination of serious game mechanics with absurdist humor generates hilarious results that look completely authentic. The UI elements are perfectly positioned and styled appropriately for the genre.
MOBA Game Interfaces
Where things get really interesting is Nano Banana Pro's understanding of game-specific culture. When asked to generate League of Legends or similar MOBA interfaces showing players interacting in chat, it generates contextually appropriate dialogue:
Generate a League of Legends in-game screenshot showing an intense
team fight in progress. In the chat area (bottom left), show players
having a heated argument about game strategy. Include typical MOBA UI
elements: ability bar, minimap, scoreboard, item slots. The chat should
look like authentic player behavior during a competitive match.
The model understands the cultural context of different gaming communities and represents them accurately — sometimes uncomfortably so. For game designers, content creators, and anyone in the gaming space, this is an incredibly useful capability.
Product Rendering and Photography
Product photography is where Nano Banana Pro's combination of text rendering, lighting control, and compositional intelligence really shines. The ability to place products in any environment while maintaining brand consistency opens up workflows that would be expensive or impossible with traditional photography.
The Album Cover Example
Let me walk through a detailed example that demonstrates the full capability. I started with a simple concept: a fictional album cover. First, I generated the CD and case:
Generate a CD album product shot. Album title
"MIDNIGHT ECHOES" in stylized modern typography. Album art shows
surreal, dreamlike imagery blending electronic and organic elements.
Include both the CD and jewel case. Studio lighting,
clean white background, product photography style.
Now here's where it gets interesting. With this product established, I could place it in any environment while maintaining perfect consistency:
// 90s Record Store
Place this CD product on a wooden shelf in a 1990s record
store. Surrounded by vinyl records and old cassette tapes. Warm
tungsten lighting, neon sign reflections in the background,
dust particles floating in the air. Nostalgic atmosphere.

// Surreal Floating
The CD is floating in mid-air surrounded by shattered glass
fragments and floating clock gears. Concept: "dreams" and
"time travel". Cinematic lighting, dramatic composition.

// CD Player Scene
The CD is being placed into a portable CD player. CD case
stands nearby. Late afternoon sunset light through curtains.
Wooden table surface. Cozy, contemplative mood.

// Concert Scene
Place this product in a stadium concert environment.
Crowd energy, stage lighting, massive screens in background.
The CD appears impossibly large, like a concert prop.
In every environment, the text on the CD remained sharp and legible. The product maintained its visual identity while adapting naturally to each new lighting condition and context. For e-commerce, marketing campaigns, or brand visualization, this is revolutionary.
Technical Product Shots
For more technical product photography, Nano Banana Pro handles the details that matter:
iPhone 17 Pro, Cosmic Orange, rear 45-degree angle emphasizing back design
and camera module.

Background: Soft gradient tech-aesthetic abstract pattern with natural flowing
movement and modern art atmosphere. Avoid pure black. Emphasize light-shadow
interplay and subtle color transitions.

Floating text elements around device: "A19 Pro Chip", "8x Optical Zoom",
"48MP Rear Camera" — modern floating layout, transparent text boxes, clean
and tech-forward aesthetic.

Overall: Dynamic, futuristic, professional product photography quality.
The Perler Beads Discovery
This was a complete accident. I was experimenting with different craft styles when I stumbled onto Nano Banana Pro's remarkable ability to generate perler bead (also known as fuse bead or hama bead) art. The results are so consistent and adorable that it's become one of my favorite aesthetic styles.
3D perler bead art: a display box containing an exquisite figurine.

Style: Photorealistic rendering showing individual bead textures, glossy
finish, professional product photography lighting.

Include: Visible bead grid pattern, subtle shadows between beads, slight
imperfections for authenticity.
The model understands that perler beads have specific characteristics — the cylindrical shape, the slight gap between beads, the way they fuse together at connection points. It renders these details accurately while maintaining the cute aesthetic that makes this craft style so appealing.
Variations that work beautifully:
- Perler bead dogs: Different breeds represented in the pixel-art-meets-craft aesthetic
- Perler bead cats with color charts: Show the character alongside the bead colors used
- Perler bead dioramas: Full scenes built from the fuse bead aesthetic
- Perler bead keychains: Smaller designs suitable for merchandise mockups
For craft pattern designers, merchandise creators, or anyone who loves this adorable aesthetic, Nano Banana Pro is a goldmine.
City Promotional Posters
Nano Banana Pro's world knowledge extends to geography and landmarks. It knows the iconic buildings of major cities and can compose them into cohesive promotional materials. This is particularly impressive for cities with complex architectural heritage.
Generate a New York City promotional poster. Background features
iconic landmarks: Empire State Building, Statue of Liberty, Brooklyn
Bridge, One World Trade Center, Times Square. Landmarks should have
visual hierarchy with clear primary and secondary emphasis.
Clean line-art illustration style with a bold color scheme.

Central large typography: "NEW YORK" with smaller text "The City
That Never Sleeps" nearby. Tagline below: "Where Dreams Take Flight".
Include modern elements like yellow taxis and subway entrances to
show contemporary New York.

Clean, flowing composition with natural element arrangement.
Emphasize the blend of historic landmarks and modern energy.
Dynamic, metropolitan atmosphere.
The model correctly identifies and renders the distinctive features of each landmark — the Art Deco spire of the Empire State Building, the copper patina of Lady Liberty, the Gothic towers of the Brooklyn Bridge. It also understands the visual language of tourism marketing and applies appropriate styling.
Comic Storyboards and Sequential Art
For creators working on comics, manga, or storyboards, Nano Banana Pro's ability to generate multi-panel sequences is a significant time-saver. It understands narrative flow, panel composition, and how to visualize emotional beats.
Generate a 5-panel manga sequence depicting an epic battle:

Panel 1: Hero stands on a mountain peak. Villain emerges from shadows.
Tense atmosphere.

Panel 2: Their eyes meet. Battle is imminent. Close-up split composition.

Panel 3: Intense combat. Lightning flashes. Hero charges with glowing
weapon, Villain counters with dark energy.

Panel 4: Mid-air collision. Energy waves explode outward. Dynamic action pose.

Panel 5: Both warriors face each other. Hero's eyes show determination,
Villain's show complex emotion.

Style: Shonen manga action style. High contrast. Speed lines. Dramatic shadows.
The model understands the visual vocabulary of manga — speed lines, impact frames, emotional close-ups, dynamic angles. It maintains character consistency across panels and creates genuine narrative flow rather than just five unrelated images.
I've tested this with various scenarios:
- Emotional farewell scenes — melancholic, poignant tone
- Master-student relationship moments — contemplative, complex
- Original characters in slice-of-life scenarios
- Action sequences in non-anime styles
The main limitation I've noticed: sometimes panels 1 and 2 or 4 and 5 can be too similar if the prompt doesn't specify enough differentiation. Adding distinct visual elements or camera angles to each panel description helps avoid this.
4K Quality and Detail Work
The native 4K output capability of Nano Banana Pro isn't just about resolution numbers — it's about the level of detail that becomes possible. For close-up photography, product shots, and any application where fine detail matters, this changes what's feasible.
Generate a 4K ultra-detailed macro photograph of a Monarch
butterfly resting on a yellow flower. Focus precisely on the
wing scales and texture, showing the individual scales that
create the pattern. Capture petal texture at equal detail level.

Soft diffused lighting, shallow depth of field with creamy
bokeh background. Natural color palette with slight warmth.
Scientific accuracy in butterfly anatomy. The kind of shot that
would win a nature photography competition.
When you zoom into the resulting image, you can see individual wing scales, pollen grains, and the cellular structure of flower petals. This level of detail was previously only achievable with specialized macro photography equipment and significant post-processing.
When to Use 4K
Standard Quality
Fast generation (3-5 seconds) with excellent quality for most use cases:
- Concept exploration and brainstorming
- Social media content
- Initial drafts before final refinement
- High-volume generation needs
- Simple compositions without fine text
High Quality / 4K
Extended generation time (8-15 seconds) for maximum fidelity:
- Final production images
- Dense text and typography work
- Complex infographics with small details
- Photorealistic portraits
- Print-ready materials
For brainstorming and iteration, stick with default resolution to maintain fast feedback loops.
Character Consistency Across Images
One of the historically hardest problems in AI image generation has been maintaining character consistency across multiple images. You'd generate a character you loved, then try to put them in a different pose or environment, and suddenly they looked like a completely different person.
Nano Banana Pro makes significant progress on this problem through its multi-image input capability. You can provide reference images and the model will maintain identity across new generations.
Step 1: Establish Characters
"Generate a character reference sheet for Person 1: a 30-year-old Asian
woman with shoulder-length black hair, warm brown eyes, and a friendly
smile. Show front view, side profile, and three-quarter angle."

Step 2: Create Scenes
"Person 1 is sitting at a café table, reading a book. Morning light
through the window. Casual clothing."

Step 3: Change Context
"Person 1 is now at a business meeting, wearing professional attire.
Same character, different setting."

Step 4: Multiple Characters
"Person 1 and Person 2 (establish Person 2 first) are walking together
in a park. Autumn afternoon lighting."
This workflow is transformative for:
- Fashion e-commerce: Show the same model in multiple outfits without expensive photo shoots
- Character design: Explore variations while maintaining identity
- Comic/manga creation: Keep protagonists consistent across scenes
- Virtual influencer content: Generate consistent character across posts
- Game asset creation: Characters in multiple poses and expressions
Pro tip for character consistency: When providing reference images, include at least one well-lit frontal face shot. The model uses this to anchor identity. Additional angles help but aren't as critical as that primary reference.
Google's Official Scene Templates
Google has provided official prompt templates for common use cases. I've tested these extensively and want to share my enhanced versions based on real-world results. Each template follows a consistent structure that the model responds to reliably.
Photorealistic Photography Template
Structure: Shot Type + Subject + Action/Expression + Environment + Lighting + Camera Parameters + Aspect Ratio
A photorealistic [shot type] of [subject], [action or expression],
set in [environment]. The scene is illuminated by [lighting description],
creating a [mood] atmosphere. Captured with a [camera/lens details],
emphasizing [key textures and details]. The image should be in a
[aspect ratio] format.A photorealistic close-up portrait of an elderly Japanese ceramicist
inspecting a tea bowl, golden hour light streaming through a window
to the left, creating a contemplative atmosphere. Captured with an
85mm lens at f/2.8, emphasizing skin texture, weathered hands, and
the ceramic's glaze. 16:9 format.Illustration and Sticker Template
Structure: Style + Subject + Key Features + Color Palette + Line Style + Background
A [style] sticker of a [subject], featuring [key characteristics]
and a [color palette]. The design should have [line style] and
[shading style]. The background must be [background requirement].
Brand Design Template
Structure: Image Type + Brand/Concept + Text Content + Typography + Design Style + Color Scheme
Create a [image type] for [brand/concept] with the text "[exact text]"
in a [font style]. The design should be [style description], with a
[color scheme]. Include [additional design elements]. The overall feel
should communicate [brand values/message].
Product Photography Template
Structure: Product Description + Background + Lighting Setup + Camera Angle + Key Details + Aspect Ratio
A high-resolution, studio-lit product photograph of a [product description]
on a [background surface]. The lighting is a [lighting setup] to
[lighting purpose]. Camera angle is a [angle type] to showcase
[specific feature]. Ultra-realistic, with sharp focus on [key detail].
[Aspect ratio].
Minimalist Negative Space Template
Structure: Subject Position + Background Empty Space + Lighting + Aspect Ratio
A minimalist composition featuring a single [subject] positioned
in the [position: bottom-right/top-left/etc.] of the frame.
The background is a vast, empty [color] canvas, creating significant
negative space. Soft, subtle lighting from [direction]. [Aspect ratio].
Comic Panel Template
Structure: Art Style + Foreground Character/Action + Background Setting + Dialogue/Caption + Mood
A single comic book panel in a [art style] style. In the foreground,
[character description and action]. In the background, [setting details].
The panel has a [dialogue/caption box] with the text "[exact text]".
The lighting creates a [mood] mood. [Aspect ratio].
Advanced Image Editing Techniques
Beyond text-to-image generation, Nano Banana Pro excels at modifying existing images. The key is understanding how to describe your edits clearly while specifying what should remain unchanged.
The Change vs. Preserve Contract
When editing images, I use a specific structure focused on clarity about what should and shouldn't change:
KEEP: [Elements that must remain unchanged]
- "Preserve the person's exact facial features and expression"
- "Maintain the original lighting direction and intensity"

CHANGE: [Specific modifications required]
- "Replace the background with a sunset beach scene"
- "Change the shirt color from blue to red"

HOW: [Style and quality direction]
- "Ensure natural lighting integration"
- "Match the original image's color grading"

CONSTRAINTS: [What to avoid]
- "Do not alter any facial features"
- "Avoid changing the shadow directions"
Adding and Removing Elements
Using the provided image of [subject], please add [element]
to the scene. Position it [location description]. Ensure the addition
[integration description: matches lighting, fits perspective, etc.].
Keep all other elements exactly as they appear in the original.Using this image of my cat, add a small knitted wizard hat
on its head. The hat should sit naturally, matching the soft
lighting of the photo. Keep the cat's expression, pose, and
all background elements unchanged.Style Transfer
Transform the provided photograph of [subject] into the artistic
style of [artist/art movement]. Preserve the original composition
but render all elements with [description of stylistic elements].

Example: Transform this photograph of a modern city street at night
into Vincent van Gogh's "Starry Night" style. Preserve the composition
of buildings and cars but render everything with swirling, impasto
brushstrokes and a dramatic palette of deep blues and bright yellows.
Multi-Image Composition
Create a new image combining elements from the provided images.
Take [element from Image 1] and place it with/on [element from Image 2].
The final image should be [description of desired result].

Example: Combine these images - take the rocket ship from Image 1
and place it launching from the tropical island beach in Image 2.
Final image should show a peaceful beach scene with a rocket
dramatically launching in the background, sunset lighting.
High-Fidelity Identity Preservation
For edits where maintaining facial identity is critical:
Using the provided images, place [element from Image 2] onto
[subject in Image 1]. Ensure the features of [subject] remain
completely unchanged — same facial structure, expression, and
proportions. The added element should integrate naturally with
[description of integration requirements].

Example: Take the woman with brown hair and blue eyes from Image 1.
Add the logo from Image 2 onto her black t-shirt. Keep her face
and features exactly unchanged. The logo should look naturally
printed on the fabric, following the folds of the shirt.
Sketch to Reality
Transform this rough [medium: pencil/marker/digital] sketch of
[subject] into a [style description] finished image. Keep the
[specific features to preserve] from the sketch but add
[new details/materials/finishes].

Example: Transform this rough pencil sketch of a futuristic car
into a polished showroom photo of the finished concept car.
Keep the sleek lines and low profile from the sketch but add
metallic blue paint and neon rim lighting.
The Mistakes That Were Killing My Results
Learning what NOT to do is just as important as learning what to do. Here are the mistakes that consistently produced poor results until I identified and eliminated them.
Mistake 1: Keyword Stuffing
What I was doing: Adding quality keywords like "masterpiece, ultra-detailed, 8K, trending on ArtStation, unreal engine" to every prompt.
Why it failed: Nano Banana Pro is trained differently than older models. These keywords either have no effect or can actually confuse the model about your actual intent.
Better approach: Focus on descriptive specificity rather than quality keywords. Describe exactly what you want to see.
Mistake 2: Negative Prompting
What I was doing: Writing "no blur, no artifacts, no deformed hands, no extra fingers."
Why it failed: Nano Banana Pro doesn't support negative prompting in the same way as diffusion models. Telling it what not to do can actually introduce those elements.
Better approach: Describe what you want positively. Instead of "no blur," say "sharp focus."
Mistake 3: Vague Style References
What I was doing: Writing "beautiful image, stunning, amazing, gorgeous."
Why it failed: These words don't provide actionable information. What makes something "beautiful" is subjective.
Better approach: Describe specific visual characteristics. "Warm color palette with golden highlights" tells the model exactly what to render.
Mistake 4: Ignoring Aspect Ratio
What I was doing: Not specifying aspect ratio and then trying to crop results to fit my needs.
Why it failed: The model composes images differently based on aspect ratio. A square composition has different balance than a cinematic wide shot.
Better approach: Always specify your target aspect ratio upfront. "16:9 horizontal," "9:16 vertical," "1:1 square."
Mistake 5: Overcomplicating Prompts
What I was doing: Trying to specify every possible detail in one massive prompt.
Why it failed: Beyond a certain complexity, elements start getting lost or conflicting with each other.
Better approach: Start with core elements, generate, then refine through conversation with targeted follow-ups.
Mistake 6: Forgetting Thinking Mode
What I was doing: Using standard mode for complex compositions.
Why it failed: Standard mode doesn't engage the full reasoning capabilities for intricate requests.
Better approach: For complex compositions, activate thinking mode. This allows the model to deeply analyze spatial relationships before generating.
The meta-lesson: Nano Banana Pro is a conversation partner, not a slot machine. Treat it like directing a very capable artist — give clear direction, review results, refine collaboratively. The iterative approach beats trying to nail perfection in a single prompt.
API Integration for Developers
For developers who want to integrate Nano Banana Pro into applications, the API is available through Google AI Studio and Vertex AI. Here are the key technical details:
Basic Generation Request
from google import genai
from google.genai import types

client = genai.Client()

response = client.models.generate_images(
    model='imagen-3.0-generate-002',  # Nano Banana Pro
    prompt='A photorealistic portrait of a robot barista...',
    config=types.GenerateImagesConfig(
        number_of_images=1,
        aspect_ratio='16:9',
        output_mime_type='image/jpeg'
    )
)

# Access the generated image
image_data = response.generated_images[0].image.image_bytes
Image Editing Request
response = client.models.edit_image(
    model='imagen-3.0-capability-001',
    prompt='Change the background to a sunset beach...',
    reference_images=[open('original.png', 'rb')],
    config=types.EditImageConfig(
        edit_mode='INPAINT',
        number_of_images=1,
        input_fidelity='high',  # Critical for identity preservation
        output_mime_type='image/png'
    )
)
The input_fidelity='high' setting dramatically improves identity preservation when making edits to images with faces or important details.
Key Parameters
aspect_ratio: "1:1", "16:9", "9:16", "4:3", "3:4", "21:9"number_of_images: 1-4 images per requestoutput_mime_type: "image/jpeg" or "image/png"input_fidelity: "low" (faster) or "high" (better identity preservation)safety_filter_level: Controls content filtering strictness
Rate Limits and Quotas
Be aware of the usage limits:
- Gemini 2.0 Flash quota limits apply to image generation
- If you hit your daily limit, switch to "Fast" mode to continue with standard generation
- Enterprise Vertex AI accounts have higher limits
- Consider implementing request queuing for high-volume applications
The Ultimate Prompt Library
I've organized my most successful prompts into categories for easy reference. These are all tested and refined through multiple iterations.
Portrait Photography
Environmental portrait of a [profession] in their workspace.
Natural window light from the left creates soft shadows.
Subject positioned at one-third mark, looking slightly off-camera.
Background shows authentic tools of their trade, slightly out of focus.
Shot at 50mm f/2.0 equivalent. Warm color temperature.
Authentic, documentary photography style.
Product Shots
Hero product shot of [product] floating against a gradient
background transitioning from [color 1] to [color 2].
Three-point lighting creating dramatic shadows and highlights.
Product at slight angle showing dimensional form.
Reflection on glossy surface below.
Key features labeled with minimal floating text callouts.
4K resolution, premium brand photography aesthetic.
Illustration Styles
Vintage travel poster for [destination] in 1930s Art Deco style.
Bold geometric shapes, limited color palette of [3-4 colors].
Iconic landmark as central focus with stylized sun rays behind.
Large sans-serif title "[DESTINATION NAME]" at top.
Small tagline "[inviting phrase]" at bottom.
Slightly distressed texture for authenticity.
Vertical format for poster printing.
UI/UX Mockups
Mobile app UI design for a [app type] application.
Modern iOS-style interface with [color scheme] accent colors.
[Screen type: home feed / profile / settings / etc.]
Include realistic content: [specific elements].
Clean typography with SF Pro or similar.
Subtle shadows and depth.
Device frame optional.
Focus on usability and visual hierarchy.
Concept Art
Concept art for a [genre: sci-fi/fantasy/etc.] [location type].
[Time of day] lighting creating [mood] atmosphere.
Key features: [list 3-5 distinctive elements].
Human figures for scale in [locations].
Painterly style with visible brushwork in backgrounds,
detailed linework for architectural elements.
Cinematic composition with strong foreground-midground-background separation.
16:9 format for game/film presentation.
Infographics
Infographic explaining [process/concept] in [number] steps.
Clean, modern design with [color scheme].
Each step numbered with icon and brief explanation text.
Visual flow from [direction: top to bottom / left to right].
Connecting arrows or lines between steps.
Title: "[Topic Title]" at top in bold.
All text must be crisp and legible.
White or light gray background.
Suitable for [platform: social media / print / presentation].
Final Thoughts
That night when Nano Banana Pro launched, I experienced something I hadn't felt since my first encounters with AI image generation: genuine wonder at what was suddenly possible. The barriers that had defined my workflows — text rendering limitations, consistency problems, lack of reasoning — evaporated one by one as I explored.
But I've also learned something more profound through months of intensive use: the tool matters less than the person wielding it. Nano Banana Pro is incredibly powerful, but that power is only useful if you understand how to communicate your vision clearly, iterate thoughtfully, and recognize both the capabilities and limitations of the technology.
The techniques in this guide are starting points, not endpoints. The creators who will do truly remarkable work with Nano Banana Pro are those who take these foundations and push beyond them — combining capabilities in ways no one has thought of, solving problems no one realized were solvable, creating visual experiences that surprise and delight.
"When AI becomes more powerful, the only thing limiting us is our own impoverished imagination."
I wrote that in my notes at 5 AM on the night Nano Banana Pro launched, and it's become something of a guiding principle. The technology will keep advancing. New capabilities will emerge. But the fundamental skill — translating the images in your mind into instructions a machine can execute — will remain valuable regardless of which model is current.
So experiment relentlessly. Push boundaries. Try prompts that seem impossible. Generate thousands of images. Learn what works and, equally important, what doesn't. Build your own intuition for how these systems think.
The future of visual creation is collaborative — humans providing vision, direction, and judgment; AI providing execution speed and technical capability. Nano Banana Pro is the most capable collaborative partner we've had yet. The question is no longer "can AI do this?" but "what should we create together?"
I can't wait to see what you make.
Ready to start? Open Gemini, enable Thinking mode, and try this prompt: "Generate a detailed movie poster for a film that exists only in my imagination — a story about [your idea]. Make the title the visual centerpiece with beautiful typography." Then iterate, refine, and make it yours.
Discussion
0 commentsLeave a comment
Be the first to share your thoughts on this article!